This article shows how a user can send a message from within their NPressive portal.
How to Steps
Select the Messages module in the purple navigation bar on the left.
Choose the Compose button in the Messages sidebar, which opens a modal on the right side of the screen.
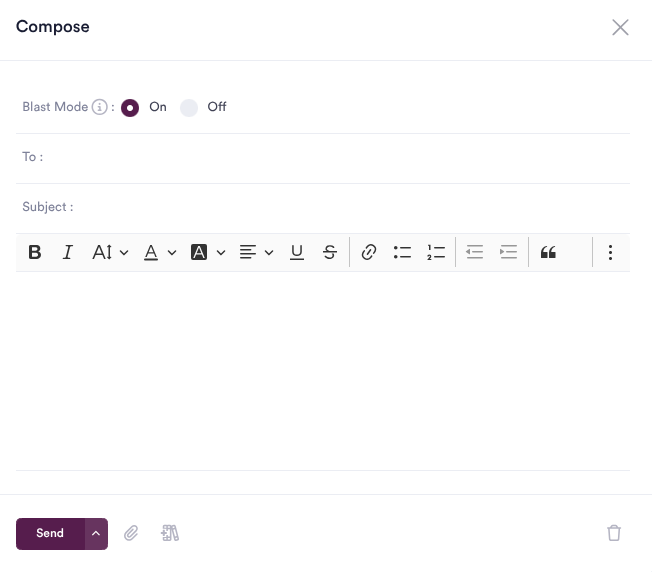
Enter the name of a member in your NPressive Instance in the To field.
Enter a Subject, which will serve as the subject line for the message.
Write your message in the text area at the bottom of the modal. You may use the available formatting tools to adjust as desired.

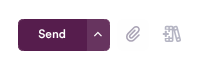
Once complete, select the Send button to queue the message for delivery.
A success message appears in the upper-right corner, stating that the message has been successfully queued.
Confirming Delivery
To confirm delivery of your Messages, take the following steps:
Select the Sent folder in your Messages module
Once you find the message you want to view, select the View icon.
Detailed delivery stats - queue, delivery, open -- will appear here for each message.
Options Actions
Attending Attachments
To the right of the Send Button, you'll see icons to attach a file from your computer or add a file from the Library.
Scheduling Delivery
If you select the caret on the right of the Send button, you can schedule to send your message later using the date picker and time picker.

Admin-only Advanced Actions
Admins/Managers have access to advanced actions such as message personalization and the following:
Channel: Select between email or SMS Text
Blast Mode: Select between On or Off
Reply To: Select between a secure or personal email
Priority: Select from Low, Medium, High
Receipt: Enter an email to send a delivery receipt